by Steve Hirschhorn
A rod by any other name…
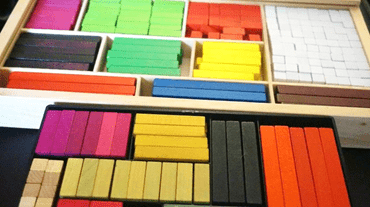 Figure 1 Two boxes of Cuisenaire Rods, the top one a new set and the other, an original from 1981!
The first of these articles examined the basic principles which support the use of the Cuisenaire Rods (rods) in the language learning classroom. In this, the second article, I would like to offer some actual activities designed to elicit particular language, whether structure, function of lexis.
Let’s start with some obvious and commonly used ideas before moving on to some slightly more sophisticated uses.
Looking at the rods, it’s inescapable that some are longer than others, thus comparatives are an easy place to start.
Place a yellow rod on the table and then a blue rod next to it. See figure 2.
Figure 2: The blue rod is longer than the yellow one.

I mentioned in the first article that it’s always best to elicit rather than tell so now, use a finger to show how the blue rod extends further than the yellow, and use whatever convention you have to invite students to comment. Of course they could comment on either the blue rod being longer than the yellow or the yellow rod being shorter than the blue one! That’s good because we want to allow for student interpretation of a context. We certainly don’t want to force them to say something – invitation is the key leaving a degree of latitude while using a situation which has a limited number of possible responses.
Now, we have elicited that there’s difference between these two rods and since they were lying flat on the table, you have probably used ‘longer’ and ‘shorter’ than. But what happens if you stand the rods up?
We have ‘shorter’, of course but we now need ‘taller’. In case students don’t know this word (or any other) I use my own IPA chart with the font I created.
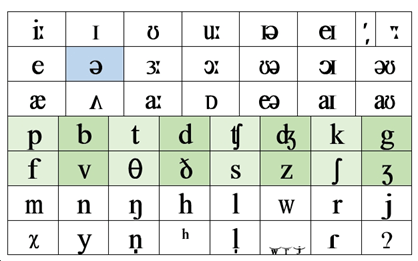
Figure 3: my version of the IPA chart
To point out the word after giving a reasonable amount of time for learners to find the word they need. This for me, is all about giving students a sense of self-determination, the teacher doesn’t simply give things but offers tools to challenge and discover. Whenever you introduce such language via a rod-based situation, you also need to give students time to ‘play’ with that language. This will become a convention in your rods classes – when language is revealed, students then take over and play with it together, with as little intervention from the teacher as possible. I use a simple hand gesture to let learners know that they can now try out this new area of language, while pushing the box of rods towards them.
Keep an ear out for what they’re doing but try as far as you can to leave them alone. If there is a common error or one which demonstrates a lack of understanding – for example a student is using ‘short’ for ‘long’ or is omitting ‘than’, then offer a quick recap, either using the rods again or using a white board focus. Just as in other teaching approach, avoid pinpointing the student(s) who have made the error, instead treat this phase as perfectly normal and having checked that everyone is ok, move along.
The next step with comparatives may be to use plurals, not a big jump and yet very useful.
There are plenty of other adjectives which can be used with the rods but I’ll leave you to discover them.
Another fairly obvious, low level area of language is: ‘there is’ ‘there are’. Place one light green rod (or any other colour, of course) on the table and using your ‘speak’ convention, elicit ‘there’s a light green rod on the table’.
I use contractions right from the start of the learning process but that’s up to you. Make sure everyone’s with you and then add a red rod to elicit the plural. Now you can move on to something longer if not much more complex: ‘there’re two light green rods and four blue ones on the table’. See Fig 4.
Figure 4
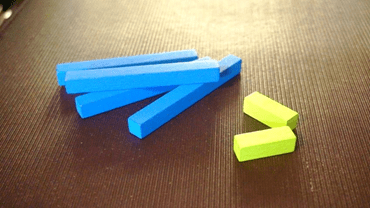
Note the use of ‘ones’, something else which I introduce very early since I think it’s extremely useful. You can also play a little game with this structure getting students to decide if what you say (or what a colleague says) is true according to what is in front of them: T: “There are four yellow rods, a light green and eight white ones on the table” Sts: “Yes!” or “No!” Of course you are also working on numbers and colours here.
In a similar vein, ‘have got’ (or ‘have’ if you prefer) is simple to demonstrate and students will quickly involve themselves using the ‘true/false’ game. Use the 3rd person too, without preamble, simply use it and students will follow: “Jenny’s got 4 white rods and a couple of light green ones.”
All of this language leads on to other language quite naturally, at least in my mind! See where you think these areas can go. Very often learners will lead if they are given a chance and if the conventions associated with having students take responsibility for their own learning are clear.
If by chance students don’t say what you want or expect, try to work out a) whether the language they have produced is acceptable for the given situation or b) how you can guide them more effectively!
Prepositions of place are commonly presented using the rods. Some of those are: ‘on’, ‘in’, ‘next to’, ‘between’, ‘in front of’, ‘behind’, ‘on top of’ and so on. There are two clear ways in which these can be demonstrated, using rods as rods as here and using rods as objects as here, where I have built a wall with a cat on top, a street in front, a lake behind and then a row of buildings.
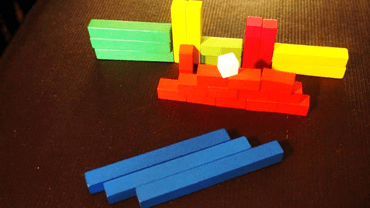 Figure 5: Teacher’s view, lake or swimming pool, wall with white cat, street and row of buildings
It seems to me that this latter approach is more interesting for learners and enables some lexical extension too. As usual, I try not to tell students what’s what but elicit, so “this is a place where you can watch films” for cinema or “you can post letters here” for a post box and so on.
Having established what the objects are, students can then either simply state “The cinema is next to the butcher’s 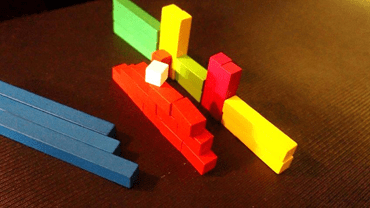 shop” or, we can introduce a little role playing, so that students ask each other, “Where’s the post office please?” (at low level) “Is there a post office around here?” (at slightly higher levels), the answer being “It’s next to the cinema” for example. You can have a car park underneath or over the supermarket or a police station at the end of the street and so on. This may nicely lead into giving and understanding directions if you think that learners need that function. I generally use several tables for a more complex activity for this function.
Figure 6: another view
Divide students into groups of 3 or 4 and give them a bunch of brown rods and 2 or 3 others. Also give them a list or buildings they need to place around the streets.
Show them a simple map using brown rod as roads which they should replicate and then get them to work together to place their own listed buildings about the streets. See Fig 7.
Figure 7: roads and bridge over river, bunch of rods to create map
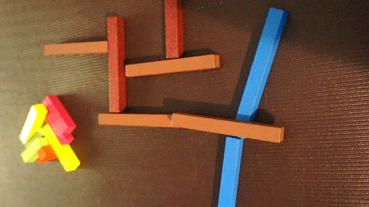
Have students list the names of their buildings on the white board so all can see which group has what. Agree a starting place and then have them asking and answering so that in the end, they should all have the same ‘maps’, more or less! Language which emerges from this should be, for example: “Excuse me, where’s the nearest bank please?” “Go straight on, take the first right, over the bridge and the bank is on your left.” Obviously, some buildings might end up in the same place as others but that’s ok, it’s just a game. When all have finished, have students wander around looking at the ‘maps’ to see if they agree.
Moving on to something a little more complex, I use a countryside scene to elicit that someone, whatever name they choose for that little red rod, lives here (let’s call her Jill). I get them to describe the scene, with the river, trees, sheep, a few houses or cottages and then I ask them to discuss what prospects Jill has given that there’s not much work in the area. I use a circle of orange rods away from the village and elicit that this is a city. See Fig 8.
Figure 8: red rod is person, white sheep, river, single track road, small houses and city in the distance
They decide that Jill should move to the city to find work – which she then does. I use my standard time cues to show that years pass but you can also use the white board and simply draw a timeline.
Now, this is harder to describe than to do! Remove the trees but showing a cutting down motion, destroy the cottages, widen the road, and elicit the key verb for each action, place new buildings where the old were and generally ‘modernise’ the town.
Figure 9: Jill still in the city, trees have been felled, road has been widened, high rise buildings have been built
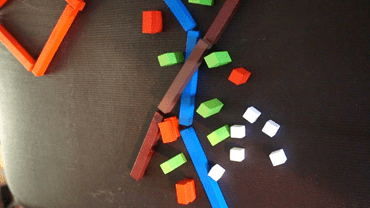 Indicate that time has passed and reintroduce Jill. Ask “is the village different?” “What’s happened?” There are various ways in which this can go now, we might go for the present perfect passive “the trees have been cut down, the cottages have been replaced with flats” and so on. Or, equally authentic would be: “They’ve cut down the trees, they’ve destroyed the cottages etc etc”.
This is a quick overview of what, in effect has become a complex and interesting activity leading into discussion or role play on the topic of modernisation and loss of traditions!
To elicit the passive for a process, I build a (very) loose map of South America and the UK! See Fig 10
Figure 10: river with logs leading to sea and ship carrying the logs to the UK for processing
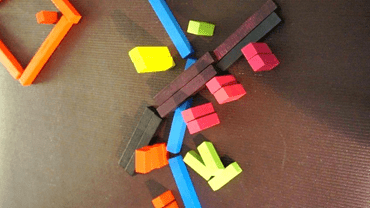 Then I show trees being felled, floated down the river to the sea where the logs are loaded onto a ship and transported to the UK (or wherever you want). There, they are unloaded and carried by road to a processing plant where and so on…
Focus on conditionals can be fun using the rods. Given that the concept of the conditional lies in the ‘if’ clause, I need to present a situation which show clearly that the key is there and what follows is just a consequence.
I slowly build a tower of single rods, making sure that students are engaged with the suspense of the process and that it is obvious that I am going to continue adding rods (thus the concept of high probability in the 1st conditional). At a certain point, I ask student to tell me when to stop.
Figure 11: tower which will fall if I …
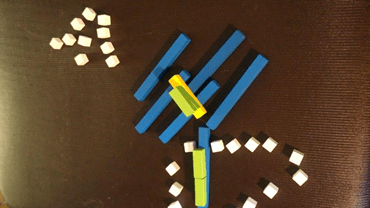
Sometimes the tower falls and I start again, that’s fine. At a certain point students will tell me to stop, “Why?” I ask, what they say next depends on whether they know ‘if’ or not. In general, that is nine times out of ten they do and will try to put something together: “If you put another, the tower/building/rods fall” This is a fair start when approaching the first conditional. I am now going to use rods as words (see article 1) to re-elicit what they can do, then I’ll use the techniques described in the first article to guide them towards something which is more accurate.
Other conditional forms can be elicited using similar techniques but I’ll leave you to work on those! Think about: “If I had another one, I’d be able to …” or “If she hadn’t put that one on the top, it wouldn’t have fallen down” and so on.
Some years ago, teaching young teens I developed what I called a computer game using the rods! In fact it’s a problem solving device in which someone has to get from ‘a’ to ‘b’ but various obstacles pop up as they go. I start with a person and in front of him or her, a forest, it’s night and very dark; will he go round or through? As he progresses I introduce dangers and students have to work out or suggest ways to overcome them. There’s a river, wild animals, a storm if he goes that way but falling trees that way and so on! Language in this activity is extremely free and varied, you can imagine what can be said.
Figure 12: the red rod is the person, green, the forest, black, dark clouds overhead and the red/orange is sunset!

This might be a good time to mention that the rods alone will not accomplish all these things. You’ll need to develop some mime, some facial expressions (fear, for example) and some sound effects!
Of course, in almost all of the scenarios I have described above, there are ample opportunities for students to take the lead; I have simply tried to show what might be done but there’s so much more!
I mentioned in the first article that I am not promoting Silent Way here and yet, it seems to me that the rods are nothing without some of the background, supporting philosophy which originates with Silent Way. Three of perhaps the most important pillars of Silent Way are student Independence, Autonomy and Responsibility all of which figure high on my own list of priorities when using the rods.
At some point in 2019, I’ll be running a 3 day hands-on workshop/retreat on using the Cuisenaire Rods creatively and how the Silent Way can be adapted for the demands of a 21st century classroom anywhere in the world.

